Eileen Mayo
Children's Book Author


Paper Plate Snowman
What a fun way to decorate your wall for winter. This easy kids' craft is a silly chilly friend and looks great during the holidays or as a winter decoration after all the holiday decorations come down.
What you'll need:
-
2 Dinner size paper plates
-
Construction or Cardstock: Black
-
Craft foam: Orange
-
Masking or Duct tape
-
Glue Stick
-
Red or blue lunch bag
-
Pipe cleaners: 2 black/ 1 red or blue to match your lunch bag
-
Hole punch
-
Scissors
-
Metal paper fastener
How to make it:
-
Print out your snowman hat, boot, and face patterns and cut them out of the construction paper indicated. We chose black for our snowman’s hat, but it is fun to let the kids pick out their favorite color for the hat.
-
For the face: Take one of the paper plates and glue it on the eyes, nose, and mouth with a glue stick.
-
Attach the hat above the eyes with a glue stick. For added strength, flip the head over and tape the hat to the back of the snowman head with masking or duct tape.
-
For the body: Take the other paper plate and make two holes in the rim of the plate on opposite ends. These will be for the arms. Shape each pipe cleaner end into three fingers by bending them and twisting them together. Insert the pipe cleaner non-finger end into each of the two holes and twist the end together to attach.
-
Make another hole in the body plate with your hole punch on the rim between the two arms. Make another hole in faceplate and attach the faceplate to the body plate with a metal paper fastener, adding tape on top of the fastener on the back for extra strength.
-
Attach each boot to the bottom of your snowman with a glue stick. Flip your snowman over and add a strip of tape on each boot for added strength.
-
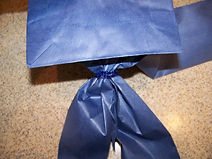
For the scarf: Use your scissors to cut up the middle of the bag on the side without the bottom fold to the edge of the fold. Cut up both sides to the bottom fold. Fold each side at a 45-degree angle away from the middle cut.
-
Turn the bag over and cut up the middle of the other side. To form the knot of the scarf, wrap a pipe cleaner around the base of the bag bottom to form the knot of the scarf.
-
Wrap the two neckpieces of the scarf around the back of the snowman and attach the scarf to the snowman with tape in the back.
-
Make fringe on the ends of the scarf by cutting slits on each scarf end along the edge about two inches up.
-
To hang your snowman, attach a string loop to the back of the head plate with tape.

Easy print version